|
uMouse (version 1.1) |
|
||||
Note: This project is currently on hold and download links are currently disabled as I will have to fix some problems (restore a previous version and recover parts of the code I lost due to a hard disk failure).
I will be returning to finish this as soon as I will have released the alpha version for UniMap Project which for the moment takes priority. Meanwhile, if you whish to test the current version please drop me an email. I apologize for the inconvenience.
Get uMouse:
- Download uMouse windows binary/setup
- Download manual in pdf format
Supported hardware:
Currently, any USB camera or capture card is
supported.
What is uMouse and why use it?
With the uMouse application and any USB
video camera you can now replace the ordinary mouse, keyboard functionality and
have hands free computer control. You can now control the cursor and do the
clicks just by slight movements of your head, hand or finger. The software
provides real-time visual tracking and translates this into mouse controls. In
addition the software is capable to interpret gestures as well as map these
actions in keyboard events.
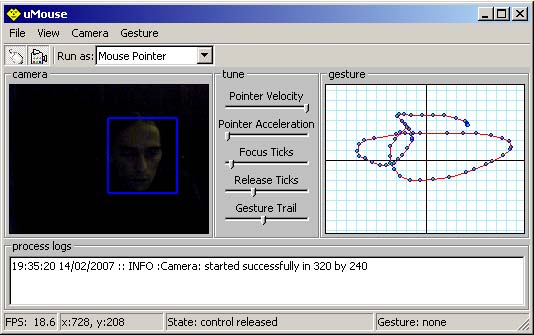
(Snapshot of the uMouse interface at work)
Get started:
Download the binary installation package
from here and install it. Currently supported platforms are windows 2000
and XP. After you completed the installation, plug in your camera and start the
application.
Running uMouse:
After you uMouse application was started,
check to see if you have video feed from your camera, otherwise check your
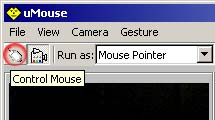
camera and/or refer to the configuration chapter bellow. Now click the first
button on the toolbar to start control of you mouse cursor. Alternatively you
can use a keyboard shortcut CTRL-ALT-G to toggle on and off the control.
Working with the camera in higher
resolutions will provide a finer tracking control,
however that might prove overhauling for your CPU. To make sure of that doesn’t
happen check how many frames per second you process in the down-left corner of
the status bar. A reasonable value for FPS should is above ten. I would
recommend, for most cases, to work with the camera at a resolution of 320x240,
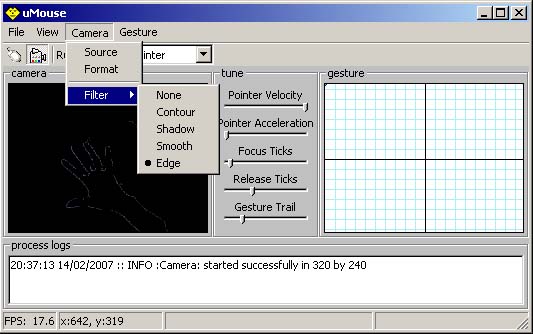
which provides enough tracking accuracy and low CPU usage. To change the camera
resolution go in the top menu at Camera->Format
option. You can also apply filters on the video stream by selecting one from
Camera->Filter menu. This could help on better tracking under certain
conditions of image or light quality.
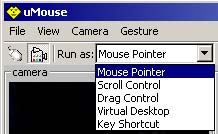
If you whish to change the function to which
the tracking control applies, you can select that from within toolbar “Run as”
option. There are five different methods listed there, however in this version
only the first was implemented.
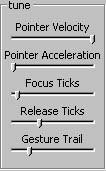
The “tune” panel found in between the camera
window and gesture is used for quick adjustment of the cursor motion and
action, gesture controls. You can also control the sliders with keyboard
shortcuts. You need first to type the shortcut letter to select the slider you
want and then us the left-right arrow keys to adjust the value. Here is a sort description of the meaning of
these sliders.
·
In order the first to sliders define de velocity and the acceleration of
the cursor – note that these two parameters differ from the mouse parameters
used by the system. The keyboard
shortcut for velocity is “s” and for acceleration is “a”.
·
Focus ticks defines how long before your cursor change state in focus
mode when it would either wait for a gesture to action or popup the menu for
selection. The keyboard shortcut for this slider is “f”.
·
Release ticks mark how quick the cursor should get out of the focus
state if no action was selected. The keyboard shortcut for this slider is “r”.
·
The gesture trail is used in gesture recognition by defining the length
of the trail left by the cursor in order to achieve a certain mark within a
time frame. The keyboard shortcut for this slider is “g”.
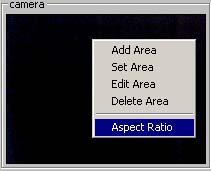
By right-clicking in the video widow you will
get a menu from where you can define the active area to be processed or you can
set the aspect ration for the video window. Defining custom areas can be
beneficial in reducing the CPU usage or either to restrict movements from the
background from being processed. In order to do that you need first select to
“Add Area” then adjust the area by dragging it by the corners and then select
“Set Area”.
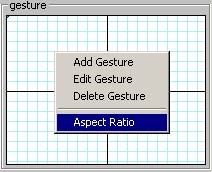
In the gesture widow you also have a popup
menu from where you can either add a new gesture pattern or also set the aspect
ration for that windows as well. The functionality for
gesture editing isn’t currently implemented.
On minimization the program will dock in the
taskbar icon area. Right click on the icon to access the menu from where you
will also be able to stop or start the tracking. With the application minimized
the CPU usage will be reduced.

Configuration:
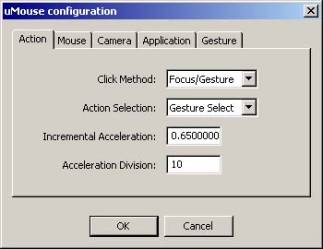
1. The main configuration options you
will find under in File->Config. There in the first tab (Action) you can
configure the following parameters:
- Click Method – here you can select which
methods should be used as a click. This can work in two different setups:
- Focus/Gesture – where to achieve a click you
have to keep the cursor still for a given (configurable) period of time
and then to execute a click you need to make a certain gesture, also
configurable.
- Long Focus – where the click is realized
simple by keeping the cursor still for a configurable number of ticks.
- Action Selection – here is the way you can
select your action. This can be done either by gesture or by using a popup
menu.
- Incremental Acceleration – this is an
advanced parameter to fine-tune the acceleration of the pointer
- Acceleration Division – another advanced
parameter to set the smoothness of the cursor motion
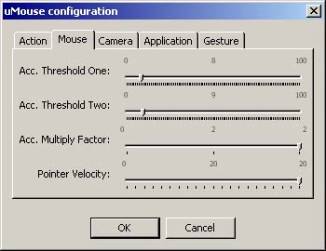
Under the mouse tab the user can adjust the
default mouse parameters as these are defined in windows. Note that this will only apply for the uMouse
control and will not impact on your desktop mouse settings.
In the camera panel you can set your camera
id, in case your system has more then one camera. The second entry refers to
how many frames per second the camera should handle. However this parameter
represents a maximum allowed not the actual value, which could well exceed your
hardware capabilities. The last parameter specifies if either the system should
draw or not the camera stream on the screen – this could be useful if your
system is low on resources.

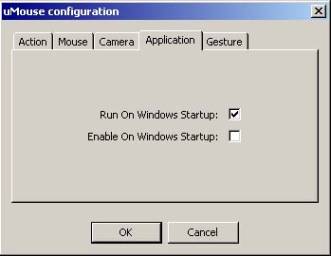
Under
the application you can set if you either want or not uMouse to run on windows
start-up. If you also set the option to enable then the mouse control will be
started as well on start-up.
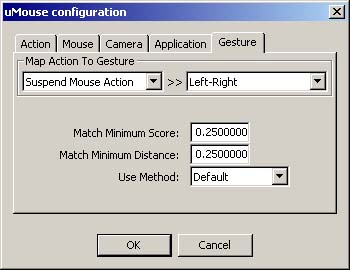
In the gesture panel you can fine-tune all
the parameters related to gesture recognition and their mappings to controls.
The minimum score and distance parameters are for the advanced so you should
handle with care. For the moment the method used for gesture recognition is the
default and that is based on a neural network approach.
Manual configuration:
Alternatively you can edit by hand the
configuration file found in the application installation folder, ex. "C:\Program
Files\uMouse\umouse.ini".
-
"
umouse.ini" has all options you found under File->Config, tune
panel and other settings
[Action]
FocusTicks=5
ReleaseTicks=33
Selection=0
IncAcc=0.650000
AccDiv=10
Type=0
[Mouse]
MouseSpeed=20
MouseAccThresholdOne=8
MouseAccThresholdTwo=9
MouseAccMultiplyFactor=2
[Camera]
View=1
State=1
Filter=0
[Runtime]
RunOnStartup=0
EnableOnStartup=0
[Gesture]
PatternDisableControl=5
PatternMouseLeftClick=4
PatternMinScore=0.250000
PatternMinDistance=0.250000
View=1
[Gui]
Width=542
Height=337
ViewLogs=1
Known bugs:
There are no known bugs at the moment. However,
if you find any please send them to me at i@larryo.org.
Any suggestions on how to improve this application are also welcome.
Main -> Work -> Information